- 180 mm
- -70°C ... +360°C
- Tensile, compression, flexure tests
- Cyclic tests
- Metals
- Geotextilies
- Plastics
- Components
- Other
The perfect extensometer for specimens with small to medium extensions
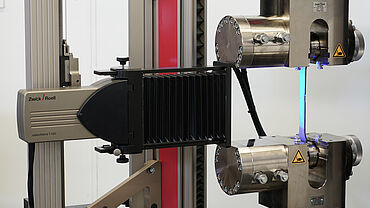
The videoXtens 1-120 P and 1-120 HP are non-contact, camera based extensometers for specimens with small to medium extensions, such as sheet metals, plastics or geotextiles. The only difference between the P and HP variants is the accuracy class.
- No specimen marking: with the blue contrast light technology, the videoXtens measures without the need for gauge marks, eliminating the time needed to mark the specimen
- Minimal operator influence and easy operation: the complete system is optimally configured for these applications; no additional lens adjustments are necessary and scale settings are retained.
- No influence on specimens: thin metal sheets or metal foils are sensitive to contact, making the non-contact videoXtens the ideal solution. It does not influence the material characteristics.
- Practical: through connection to the crosshead, the gauge marks are always automatically centered in the field of view and the measurement range is optimally utilized. Extensions outside the measurement length do not limit the measurement range.

Additional videoXtens advantages & features
The videoXtens offers additional advantages & features. All general advantages and even more information on the ZwickRoell videoXtens systems can be found here.
Change in width measurement / transverse strain measurement
With this option, the videoXtens can measure biaxially: One or more transverse strain measurements are recorded at the same time as the longitudinal strain measurement, for example the change in width directly at the edge of the specimen, contact-free and without gauge marks. The number of measuring points can be freely selected. The values are automatically averaged, but can also be evaluated individually.
The software option can be easily expanded without the need for changing the hardware. The transverse strain measurement meets accuracy class 1 (ISO 9513).
2D Digital Image Correlation (DIC)
2D digital image correlation visualizes deformations and strain over the entire visible specimen surface. This software option considerably expands the analysis options of the videoXtens. Activation is very simple, you only need a software license. The live strain measurement and subsequent 2D DIC analysis are performed with the same videoXtens and using the same marker.
A wide range of analysis tools provide different types of information: Gauge lengths, measuring points, virtual strain gauges, cutting lines, vector maps and more. Here you will find detailed information about 2D DIC.
Test Re-Run: re-calculate instead of re-testing
The test re-run function can be used to virtually repeat and recalculate the test with a modified initial gauge length. You save time on specimen preparation and testing and can run different evaluations on one and the same specimen.
During the test, the testing software records the image series. You can later use these to change the size and position of the initial gauge length as required. One click starts the recalculation and all characteristic values are recalculated on the basis of the new gauge length. Each recalculation is displayed separately, making comparisons simple and clear.
Strain distribution: every specimen counts
A break outside the gauge length causes costs and additional time for specimen preparation and retesting. This can be prevented with the strain distribution option.
During the test, the testing software automatically places the gauge length symmetrically around the break point.
The workaround offered by ISO 6892-1 in Annex I to validate breaks outside the gauge length is also activated effortlessly by our software; calculation and validation according to standard specifications run automatically and in real time. No need to manually measure and recalculate the specimen as was the case before.
2D dot matrix
Up to 100 measuring points can be set and measured in any arrangement or in the form of a grid. In this way, local strains and inhomogeneities of a specimen under load are determined. X and Y coordinates as well as the distances between dots are available as measured values.
The measured values can be easily exported or displayed as channels directly in testXpert. The prerequisite is that all measuring points are applied to a flat specimen surface, as this is a two-dimensional measurement. Typical applications includes tests on components or multiaxial tensile tests.
Flexure test: deflection measurement
The videoXtens offers different options to measure deflection. A measuring plunger is often placed under the specimen for comparability with measurements using sensors or transducers. The measurement displacement during the test is measured by videoXtens using stick-on gauge marks.
Alternatively, it is also possible to measure directly on the specimen edge: either by applying a mark to the flexure specimen or by using a backlight behind the specimen, which makes the lower edge of the specimen visible and measurable for the videoXtens. In addition to the deflection in the test axis, the polynomial approximation of the curvature can also be determined.
