Jump to the content of the page

ZHN Nanoindenter

Download
Applications
  • Hardness testing to ISO 14577
  • Scratch tests
  • Wear tests
  • Dynamic tests
  • Profilometer
Test load
  • 0 - 20 N
Versions
  • ZHN for research & development
  • ZHN-S for quality control and standard test tasks

A new dimension

The ZHN nanoindenter is used for comprehensive, mechanical characterization of thin layers or small surface areas with the necessary force and travel resolution. This includes measuring indentation hardness, indentation modulus, and Martens hardness to ISO 14577 (instrumented indentation testing).

ZHN nanoindenter for testing of metals and industrial tools

The ZHN nanoindenter is used for comprehensive, mechanical characterization of thin layers or small surface areas with the necessary force and travel resolution.

Advantages & features

Advantages & features

A testing concept offering versatility and flexibility
Applications
On the safe side with ZHN
Optimal workflow in the testing laboratory
Flexible and modular
Hardness and Young's modulus to DIN EN ISO 14577
Comprehensive range of accessories

A testing concept offering versatility and flexibility

The ZHN universal nanomechanical tester is derived from ASMEC's proven nanoindenter technology. In this first-time development, two measuring heads are combined in the normal (nanodindenter principle) and lateral (scratch tester principle) directions, operating completely independently of each other with nanometer resolution. Lateral force-displacement curves can now be measured for the first time, allowing more material parameters to be obtained than was previously possible (see Typical Applications). This includes measurement of the lateral stiffness and purely elastic lateral deformation of the specimen.

The 2-column load frame features single central lead-screw drive and precision guidance, ensuring stiffer frame design, while the indenter axis is located exactly in the movement axis. No tilting moment occurs and Abbe errors are eliminated. Device stiffness is more than 106 N/m, eliminating the need for correction and greatly simplifying calibration of the area function.

In contrast to instruments by other manufacturers, both measuring heads operate in both tensile and compression directions, enabling indentation tests with a superimposed oscillation as well as cyclic fatigue tests.

Applications

  • Coating development from soft (polymer) to hard (diamond-type coatings)
  • Determination of critical stresses for cracking or plastic deformation
  • Hard material coatings for tools and as scratch protection
  • Protective coatings on glass
  • Paints and sol-gel coatings
  • Automated measurement of hardness traverses on transverse cross-section
  • Nano coatings for sensors and MEMS/NEMS
  • Biological materials
  • Matrix effects in alloys (mapping)
  • Ceramic materials and composites
  • Ion-implanted surfaces
  • Damage analysis in microelectronics

On the safe side with ZHN

Applications in science are constantly changing. Be on the safe side with ZHN, which features a single platform, delivering flexibility and reliability.

  • The ZHN has the highest signal-to-noise ratio for the entire nano and micro range (106) of all existing nanoindenters, normal and lateral.
  • With the 20 N measuring head, in addition to instrumented indentation tests in the macro range, classical Vickers hardness testing and fatigue tests can be performed.
  • The ZHN uniquely features real force and displacement control. The measuring heads feature high lateral stiffness—changing indenters is extremely easy and calibration or measurement accuracy are not influenced.
  • The lateral force unit (LFU) is ideal for scratch, wear and multiaxial tests: even for larger forces, lateral force displacement curves are measured in nm resolution.

Optimal workflow in the testing laboratory

The entire testing system is workflow-based and adapted for testing laboratory requirements.

  • Easy operation due to intuitive workflow
  • Timer function in InspectorX allows measurements during quiet times
  • The ZHN saves time: unique mapping function measures topography, the coefficient of friction and indentation depth in a single run
  • Enclosure for reducing environmentally related influences on the test result
  • Active vibration isolation and special support table for coupling external sources of interference
  • Alternative measuring heads can be stored safely

Flexible and modular

The flexibility of the ZHN testing system is displayed through its versatile range of application as well as through its modularity and ability to make subsequent adaptations.

  • Unique tandem optics with two cameras can be expanded to include optical evaluation units (e.g. WLI or AFM). These are completely integrated into the testing system.
  • The robust design enables integration of a wide range of indenters and specimen grips.
  • Changing indenters is incredibly easy.
  • InspectorX is a modern software with clearly structured design and application modules.
Hardness sequence with a Berkovich indenter

Hardness and Young's modulus to DIN EN ISO 14577

Measurement is typically performed with a Berkovich indenter with force control. Fast measurements are possible, for example with 10-s load, 5-s hold time, and 4-s load removal.

  • Measurable values:
  • Indentation hardness HIT (reevaluate in HV)
  • Martens hardness HM or HMs
  • Indentation modulus EIT (elasticity modulus)
  • Indentation creep CIT or relaxation RIT
  • Ratio of elastic deformation component to indentation energy nIT

A total of more than 60 values can be determined.

Comprehensive range of accessories

A comprehensive range of accessories provides flexibility and modularity.

ZHN accessories

Technical overview

The modular design of the universal ZHN nanoindenter consists of:

  • Two-column load frame with central lead screw drive, precision guidance and granite base
  • Motorized central lead screw drive and programmable motorized X-Y table
  • Three-axis step motor controller as PCl-E plug-in board
  • Tandem microscope with two cameras and LED incident light, green LED
  • Control electronics for machine and measuring head
  • Interchangeable measuring heads up to 20 N
  • InspectorX control and evaluation software
  • Software modules for Autofocus
  • Software module for overview image from combined individual images with large depth of field

ZwickRoell has implemented the radial displacement correction option in InspectorX in compliance with ISO 14577:2015

ZHN-S version for standard test tasks

The ZHN-S version was configured for quality control and standard test task purposes. Because this robust nanonindenter is easy to operate, it does not require a specialist. Animations and predefined applications in InspectorX support the operator during test preparation and test performance. Operating errors are reduced and a short training period is ensured.

The ZHN-S nanonindenter is permanently equipped with a NFU measuring head. The evaluation process is also simple: and automatic fit function and range selection for measurement data analysis simplify the evaluation of measurements on coatings.

Applications for the ZHN nanoindenter

Applications for the ZHN nanoindenter

Hardness and Young's modulus to DIN EN ISO 14577
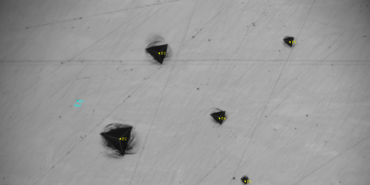
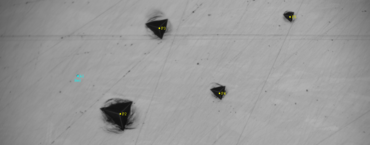
Vickers hardness
Depth-dependent measurements with QCSM module
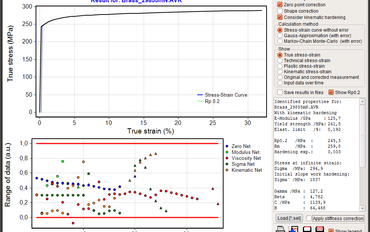
Determination of stress-strain curve with neural networks
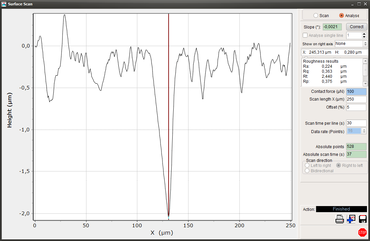
Determination of height profiles
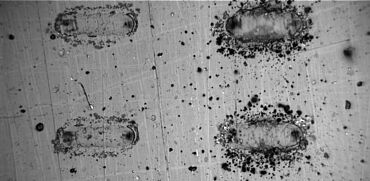
Micro wear tests
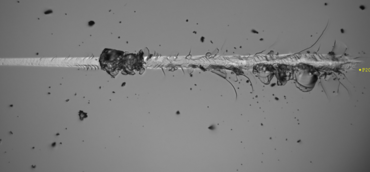
Scratch and micro-scratch tests
More applications with the ZHN
Hardness sequence with a Berkovich indenter

Hardness and Young's modulus to DIN EN ISO 14577

Measurement is typically performed with a Berkovich indenter with force control/ Fast measurements are possible, for example with 10-s load, 5-s hold time, and 4-s load removal.

Measurable values:

  • Indentation hardness HIT (revaluate in HV)
  • Martens hardness HM or HMs
  • Indentation modulus EIT (elasticity modulus)
  • Indentation creep CIT or relaxation RIT
  • Ratio of elastic deformation component to indentation energy nIT

A total of more than 60 values can be determined.

More on Hardness and the Young’s Modulus
Vickers hardness comparison

Vickers hardness

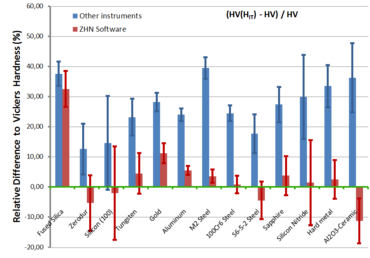
Vickers hardness can be calculated from the indention hardness. A comprehensive study conducted by the Federal Institute for Materials Research and Testing (BAM) compared 20 materials using the conventional Vickers hardness method and the Vickers hardness method with values calculated with InspectorX algorithms and reevaluated using HIT. It showed a mean difference of < 10% vs. 25-30% with other software packages.

[T. Chudoba, M. Griepentrog, International Journal of Materials Research 96 (2005) 11 1242 – 1246]

More on Vickers Hardness
QCSM - Quasi Continuous Stiffness Measurement

Depth-dependent measurements with QCSM module

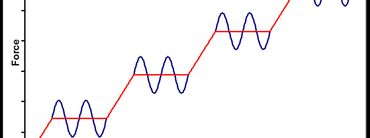
The "Quasi-continuous Stiffness Measurement Method" is a module developed by ASMEC to enable sample contact stiffness to be determined using the unloading curve for many points during the indentation process rather than just for a depth. This allows depth-dependent determination of hardness and Young's modulus at one and the same sample location. In addition, measurement sensitivity at low forces is increased, enabling stiffness values to be determined for very low forces and indentation depths. With the QCSM module the load increase is paused for a short time (1-4 seconds) and a sinusoidal vibration is superimposed on the Piezo voltage. In contrast to other methods, the amplitude for force or displacement is not specified directly. Amplitude and vibration phase are determined using a lock-in filter.

More on the QCSM Module
Neural network analysis with ZHN

Determination of stress-strain curve with neural networks

Together with the Karlsruhe Research Center, a method has been developed that allows the entire stress-strain curve of metals to be determined from indentions made by spherical indenters. It is based on the use of neural networks to identify parameters and it also takes into consideration kinematic hardening.

More on the Calculation of Stress-Strain Curves
Height profile measurement with ZHN

Determination of height profiles

Surface scans can be performed with the lateral force unit (LFU) in the X direction with nm-resolution and also without LFU with the XY tables with μm resolution. Roughness values such as Ra, Rq or Rt are determined.

More on the Determination of Height Profiles
Micro wear tests with nanoindenter ZHN

Micro wear tests

Oscillating wear tests with amplitudes up to 140 μm can be performed.

More on Micro Wear Tests
Micro scratch test on silicon, Fmax 500 mN

Scratch and micro-scratch tests

The tests are typically performed with spherical tips with a radius between 5 and 10 μm. Stress maximum is most often in the coating and not in the substrate. Multiple scans of the surface are possible. The wear on the tip and impact of surface roughness is reduced by the small scratch length.

More on Scratch and Micro-Scratch Tests

More applications with the ZHN

  • Adhesion tests (e.g. of liquids)
  • Purely elastic measurements with ball indenter to determine Young's modulus, including for very thin, hard films less than 50 nm thick
  • Micro tensile tests
  • Fatigue tests with low number of cycles
More on Nanoindentation

Do you have any questions regarding our products?

Please feel free to contact our product experts.
We look forward to discussing your needs.


Contact us

Related products and accessories

Interesting applications

Instrumented indentation test
ISO 14577
to Instrumented indentation test
Nanoindentation
ISO 14577
to Nanoindentation

Downloads

Name Type Size Download
  • Product brochure: Hardness Testing with ZwickRoell PDF 13 MB
  • Product information: ZHN – universal nanomechanical testing system PDF 2 MB
  • Product information: Specimen grips for the ZHN nanoindenter PDF 361 KB
  • Product Information: ZHN-S – Nanoindenter for Standard Test Tasks PDF 3 MB
  • Product information: ZHN/SEM – nanoindenter for scanning electron microscope PDF 1 MB
  • Product information: Specimen heater up to 400 °C for high-temperature nanoindentation PDF 418 KB
Top